Sourdough bread is usually baked from a high-hydration dough. We do not need to knead the sourdough but thoroughly mix it and, in addition, allow for a long fermentation to naturally develop the gluten strands and flavor. However, high-hydration dough tends to be sticky.
Low-hydration Dough
Low-hydration dough is not expected or even supposed to rise much. On the other hand, sourdough bread is sought after not only for its flavor but also for its open crumb due to its voluminous pop.
Not so low-hydration dough. Low-hydration dough, for example, that of which bagels are made, can and must be kneaded. Any leavening agents active in low-hydration dough do not find enough fluids to act freely. Such dough must be kneaded to spread the action. And there isn’t enough water in the dough to be sticky.
High-hydration Dough
Not so in high-hydration dough. The intentionally high water content of sourdough allows beneficial microbes to take advantage of long fermentation to actively work the natural sugars all over the flour − with the help of a bit of initial mixing and simple stretch and folds administered by the baker. However, the dough must also be able to bind and hold all the water, which it sometimes does not do. Sticky dough is the result.
What, then, is high-hydration dough? When the water content, as a ratio of the overall flour content, is over 65%, bakers consider the dough high-hydration dough.
The final benefit of high-hydration dough is that the dough will substantially rise and create an open crumb during baking at pretty high temperatures. The high water content of that dough allows for the dough’s moisture to turn into and escape as steam, which is necessary when baking loaves in a Dutch oven. The naturally generated steam in the scorching Dutch oven prevents the crust of the baking loaf from hardening before the wild yeast − in a last orgasmic outburst − produces the fantastic rise of the loaf in the first 5 to 8 minutes of baking.
Yes, baking sourdough is that much of an erotic adventure.
When is Bulk Fermentation done, when does Proofing start?
Over-fermented, under-fermented, over-proofed, under-proofed? When is one done and when does the other start? I still do not get it. What does over-proofed and under-proofed mean?
I sent a question like that to Tom Cucuzza at The Sourdough Journey and here is his prompt and succinct answer:
“This question comes up from time to time. The terms are confusing.
“Over and under proofing” is an assessment of the total fermentation results of the loaf. From the time the starter is added until it dies off in the oven. I call that the “fermentation chain,” which includes 1) Fermentolyse (if you do it), 2) bulk fermentation, 3) fermentation during shaping, 4) final proofing (countertop or fridge), and the final fermentation that happens in the first 15 or so minutes in the oven before the yeast dies off. The accumulated effect of all of these steps results in “over or under-proofing.” Which really is better described as “over or under-fermented.” But “proofing” is the collective term referring to the result of all of those steps.”
Thanks, Tom Cucuzza!
Sticky Dough during Pre-Shaping
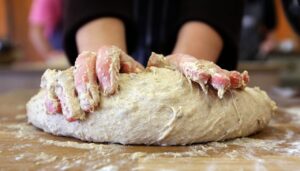
But sourdough can be sticky, quickly throwing a monkey wrench into many a home baker’s endeavor. What can be done about that? Bakers like me dust the work surface with a bit of flour before pre-shaping. Before releasing the dough from the bulk fermentation container onto the counter or table, I lightly throw some flour across the work surface.
Others may use a moistened work surface and hands. I do not appreciate any additional water in the mix. A few speckles of flour do less damage than a few drops of water, imho.
So, I utilize a very light touch of flour. The underside of the turned-out dough then becomes a bit less sticky, while the upper surface of the dough stays sticky as it perhaps is. I then make it a point not to touch the sticky upper surface of the dough in front of me.
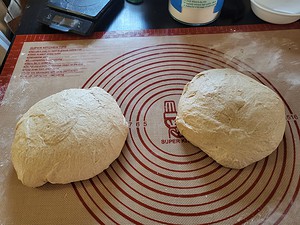
I spread a bit of flour along the line where I want to cut the batch into two equal portions and use a stiff dough scraper to do so swiftly. I then pre-shape each portion into a round ball, aka boule, − without using too much flour, as I do not want a lot of raw flour inside the dough.
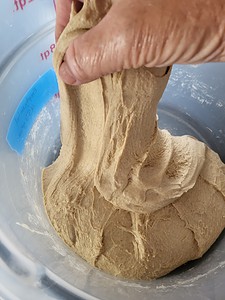
If the dough is still loose and sticky, I perform − again − a set of ‘stretch and fold’ maneuvers by taking the less-sticky underside of an outer section of the dough and stretching it up and away from me. I fold it back into the sticky middle of the dough and press lightly down on it to seal the layers. Then, I take another quarter of the dough, stretch it up, fold it back into the middle, and seal it. I repeat this process in the other two quarters of the dough. I intend for the dough to gain the strength to hold its shape. The dough then needs to rest for 20 min on the table and will re-establish a little of its elasticity.
Notice that I have avoided touching the outright sticky portions of the dough. Baking sourdough bread is a bit of a balancing act, almost an art, certainly a craft. It takes a bit of experience and a controlled environment regarding temperatures to bake consistently good sourdough bread. It is not surprising to read about the wild 49ers getting sick from their often misfermented and underbaked sourdough.
Sticky Dough is no longer a Problem
My ‘stretch and fold’ as well as my shaping skills seem to need refinement. Even at lower hydration levels, the dough is often getting wetter and stickier as I handle it. It seems that my dough does not have enough strength and it seems that I need more practice handling dough. This is no small matter and the following instructions by Richard Bertinet did help.
Final Shaping
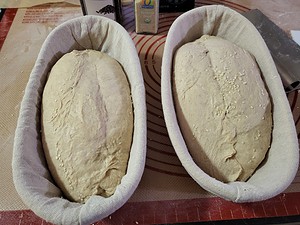
During this time, prepare the proofing baskets by either dusting the inside with flour or placing a linen cloth inside the form and dusting the cloth. Once the dough has finished resting, I finally shape the dough portions − without trying to tough a sticky surface − into boules or batards and place them into the prepared form with the seam side up. Just a slight touch, that is, a slight dusting of flour can make all the difference. This final shaping is not meant so much to aid in strengthening the dough as the ‘stretch and fold’ maneuver during pre-shaping but to form the dough into the shape desired for the baked loaves.
I cover the dough in their proofing baskets with disposable shower caps (or some loosely fitted plastic wrap). I may let the dough continue to ferment for an hour on the table at ambient temperatures, depending on my subjective judgment as to the dough’s readiness for cold fermentation. Once the dough has finished this stage of fermentation, I place the proofing baskets into the refrigerator for 12-18 hours for baking, which usually takes place the next day.
Baking
Baking in a typical kitchen oven with cast iron Dutch pots can also be tricky. At this stage of the process, it does not matter much anymore that the dough may be sticky − as long that the dough releases freely from the proofing baskets onto, let’s say, precut parchment paper. I keep my proofing baskets covered in lightly floured linen liners, and even wet and sticky dough does not remain stuck in the baskets.
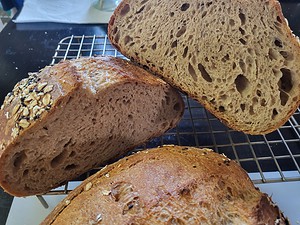
However, not all kitchen ovens are created equal. Luckily, mine is electric and cranks up the temperature of the two Dutch ovens to way over 500°F after an hour of preheating. Although I turn the heat down to 475°F after 10 minutes, at these temperatures, even wet and sticky dough does not have a chance to stay underbaked after some 30 minutes of taking the heat. Damp and sticky but well-fermented whole wheat sourdough gives rise to fabulously risen loaves and medium-open crumbs.
Perfection Anyone?
I guess it takes a while to develop a failsafe routine and to be consistent, really. A routine is implicitly trying to be a failsafe sequence of action steps. I am surprised by how many little things need to go right for success.
While I learn from my mistakes, I know that I might never get to perfection. LOL. But it can be fun trying to be proficient at a hobby…